
Overview
There are several different attachment sections in the Proposal Development document, which each have discreet attachment type lists. The various attachment sections drive different system behavior, and some can be leveraged to drive Validations or Routing rules. Schools often need to setup custom attachment types in the system or change existing attachment types. Since several of these values map to S2S functionality, it's important to understand how to update these values and what impact changes will have on your system.
Adding a Proposal or Internal Attachment
Navigate to All Links on the Dashboard and search for Narrative Types and select.
Perform an unbound Search and sort by Narrative Type. Go to the last page of your search results to find the next available Narrative Type ID. Mark down available IDs for all of the Narrative Types you are adding to the system.
Click on the create new button in the upper right-hand corner of the screen and complete the following fields on the Narrative Type document that displays.
- Description(Document Overview): Enter a description per your institution's naming standards.
- Narrative Type: Mark down the next available Narrative Type ID you made note of in the step above.
- Description(Edit Narrative Types): The name for the Narrative Type you want to display in the Proposal Development module.
- System Generated: Leave this unchecked for all manually setup Narrative Types.
- Allow Multiple: If you want your users to be able to add multiple attachments of this type to a single Proposal Development document check this box. If you want your Proposal to throw an error if a user tries to add more than one attachment of this type leave this box unchecked.
- Narrative Type Group: Enter the letter associated with the Proposal Attachment Page you want this Narrative Type to populate. These values are case sensitive.
- P - If you enter a P in this field then this type will populate the Proposal Attachments page.
- O - If you enter an O in this field then this type will populate the Internal Attachments page.

When you have completed the fields listed above press the submit button at the bottom of the page. This Narrative Type is now available on the Proposal or Internal Attachments page of the Proposal Development module as appropriate.
Note: The letters for Narrative Type Group are defined in the proposalNarrativeTypeGroup and instituteNarrativeTypeGroup parameters. P and O are listed above because those are the out of the box values for these indicators. If these steps do not work you should check these parameters and confirm your institution has not changed these values locally.
Note on Changing Attachment Types: Some Attachment Types are used by the system for specific purposes. If an approver adds an attachment during an approval or return action it will be added to the Internal Attachments page under the Narrative type indicated in the approveNarrativeTypeCode or returnNarrativeTypeCode parameter respectively. If you are using this functionality and change this Narrative Type be sure you update these parameters appropriately.
Note on Narrative Types and KRMS Rules: Inclusion of specific Narrative Types in the Proposal or Internal Attachments section can be checked with the Check specified narrative type(_) KRMS function. This function accepts the Narrative Type Code and will return true if that type code is included in a proposal. For more information on building KRMS rules see the Cross Module Functionality - KRMS Basic Rule Setup article.
Adding a Personnel Attachment Type
Navigate to System Admin Portal > Proposal > Person Document Type

Perform an unbound search and note the next available Person Document Type Code in the list. Mark down available codes for all of the Person Document Types you are adding to the system.
Click on the create new button in the upper right-hand corner of the screen and complete the following fields on the Proposal Person Document Type document that displays.
- Description(Document Overview): Enter a description per your institution's naming standards.
- Person Document Type Code: Enter the Person Document Type Code you noted in the step above.
- Description(Edit Person Document Type): The name for the Person Attachment Type you want to display in the Proposal Development module.
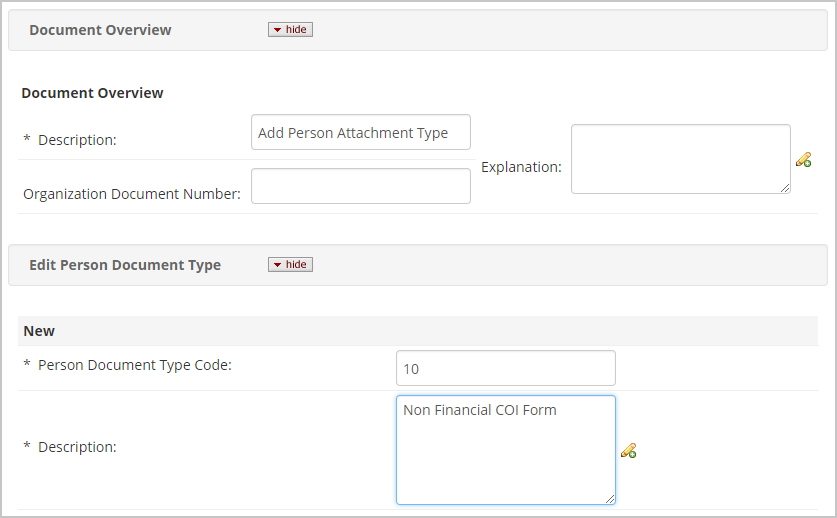
When you have completed the fields above click the submit button at the bottom of the page. This value is now available in the Personnel Attachments page of the Proposal Development Module.
Comments
0 comments
Article is closed for comments.