
Overview
The Proposal Development module in Kuali Research comes with a comprehensive form building tool called Questionnaire. Questionnaires are used to gather information for S2S submissions, as well as institutional information that isn't part of the standard proposal development data set. The first step to setting up a Questionnaire is building questions in the system. This process is detailed in the Maintenance - Create a Question article. These questions are then used to build full Questionnaires to display in the Kuali Research modules.
Note: All New Questionnaires should be built and tested in Sandbox or Stage before being built in Production to validate logic design and display behavior.
Create a New Questionnaire
Before you create a new Questionnaire you will need to have all of your Questions loaded into the system. You can search through the questions that come out of the box via the Question maintenance search or create new Questions by following the steps in the Maintenance - Create a Question article. It is recommended that you build a specification/plan for your Questionnaire in a spreadsheet along with your Question IDs as you load them into the system. This step will make building the final Questionnaire go much more quickly.
Once you have your Questions in the system, and your plan in place, navigate to All Links on the Dashboard and search for Questionnaire and select.
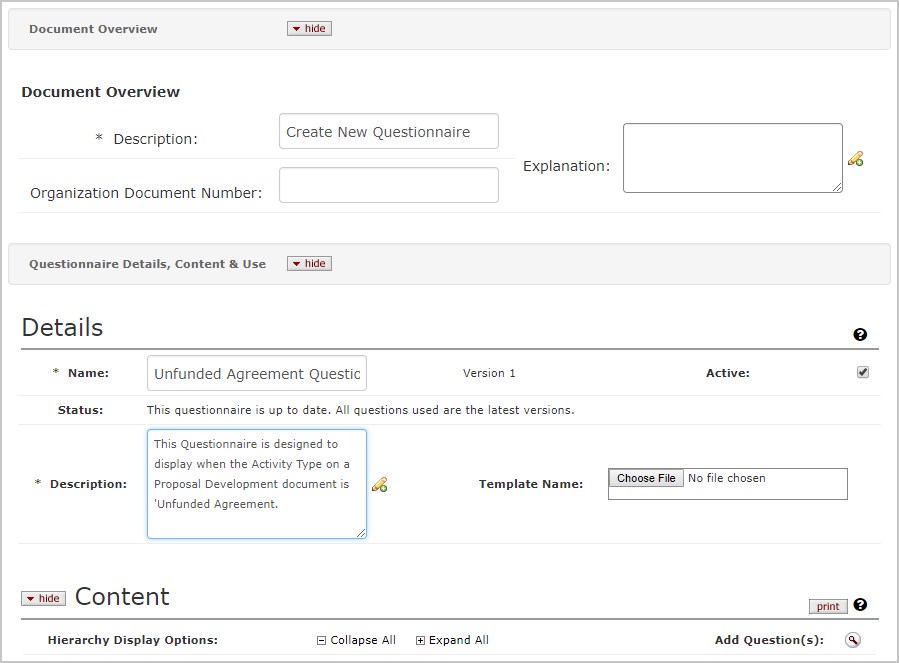
Press the Create New button in the upper right-hand corner of the screen and complete the following fields on the Questionnaire document that displays.
- Description(Document Overview): Enter a description per your institution's naming standards.
- Name: This is the name of the Questionnaire that you will use when searching for it in the Questionnaire maintenance table. This Name will not display to end users.
- Active: Check this flag. If you retire a Questionnaire you can uncheck this in the future.
- Description(Details): This field is for describing what this Questionnaire is for. It is an excellent place to keep documentation for future administrators.
- Template Name: This is an optional attachment field where you can upload your spec for the Questionnaire. This can be useful for future administrators who may not have background in this Questionnaire but may need to maintain it.
Building Questionnaire Content
Next click the show button next to the Content panel heading. This will expand the primary Questionnaire content section. The first step is to begin adding questions to the document via the top level Add Question(s) search. Click on the ![]() icon in the upper right-hand corner of the Content section. This will bring up a question search window.
icon in the upper right-hand corner of the Content section. This will bring up a question search window.
If you are able to bring back multiple questions that belong in your Questionnaire in a single search you can add them all to the Questionnaire in a single action. Creating a Question Category for each new Questionnaire will make this easier to do and save a great deal of time while building a new Questionnaire. In order to return multiple questions from the search, click the checkbox next to each question you would like to include and press the return selected button. For particularly long questionnaires it is possible to select questions on multiple search pages with the select all from all pages button.

When you add the questions above they will all populate the questionnaire at the top level of the question structure, and the first question's details panel will be open.

The next step is to reorganize your questions in the order you want them to appear to end users. First, identify any questions that should only appear based on the answer given to a 'parent' question. Click on the questions that should only appear in some circumstances and the details screen shown above will appear for them. Click on the cut node button.
Next click on the question that should be the 'parent' for the question you just cut, and press the paste button. The question you cut initially will be removed from its current place in the questionnaire, and added as a child of the question you pressed paste in. Complete this step as many times as is necessary to build the question hierarchy you need for your questionnaire.
Note: If you use the copy node button instead of the cut node button then when you paste the question it will remain in its original position, as well as copying to the new location you have indicated. For questions such as 'Please Justify' which could be a followup to several parent Questions in your Questionnaire, this can save a great deal of time. Using this feature will result in multiple questions that have the same Question ID. You should not re-use a Question ID multiple times in a single Questionnaire if that Question drives a KRMS Rule or is used in reporting.
Once you have finished setting up the necessary child/parent relationships some of your questions may be out of order. You can move a question up or down in the list relative to its siblings with the up and down arrow buttons next to the Node text in the Question Details screen. Questions at the top level can be sorted using these buttons, and when they are moved all of their children questions will move with them. Similarly, these buttons can be used to sort children of a single Question relative to its siblings, but these buttons will never push a question out of its parent/child relationship. In order to move a question to a different level of the question hierarchy, it must be cut and pasted.


The above shows the questions from our example questionnaire after organizing them using the tools described above.
Inserting Additional Questions
In some cases, you won't be able to find all of the Questions you need for your questionnaire in a single search, and you may need to add additional questions during the process of building your Questionnaire. You can use the link above to add additional parent level Questions, but if you want to add a Question directly into a specific location within the Question hierarchy structure that is also possible. To do this click on the parent Question you want to add a child too. This will expand the full details panel for that Question.
In the upper right-hand corner of the panel, there is an Add Question section. First indicate if you want your new Question to be added as a sibling of the Question you are in, or as a child. Then click on the ![]() icon at the end of the section. This will bring up the Question search screen. From here you can search for your Question. When you find it, hit the return value link next to the appropriate question. Then press the add button in the Add Question section of the screen. The Question will immediately populate the Question Hierarchy in the location you indicated in this interface.
icon at the end of the section. This will bring up the Question search screen. From here you can search for your Question. When you find it, hit the return value link next to the appropriate question. Then press the add button in the Add Question section of the screen. The Question will immediately populate the Question Hierarchy in the location you indicated in this interface.

Defining Display Requirements from a Parent Question
At this point in the process, all the Questions in this hierarchy will still display all the time in the Proposal Development document. We need to assign a Display Requirement to the Questions that should only display in certain circumstances. To do this click on the Question you want to add a progressive display requirement to.
Next, select an appropriate logic description from the Parent Response dropdown, and enter the value that should cause the Question to display when it's entered as a response to the Parent Question in the Value field. Then press the add button. Complete this process for all child questions with display requirements based on their parent questions.
In the example below, we are checking to see if the Unfunded Agreement being routed is a Material Transfer Agreement. This field was setup using an ArgValueLookup dataset per the Cross Module Functionality - ArgValueLookup Table article. So we will be testing against the ArgValueLookup 'value' field, which for Material Transfer Agreements is MTA in this case.

Note: The most common use case for this functionality is branching logic based on a Yes/No question. The recommended configuration for this is one of the two Requirement statements below:
- Parent Response Contains text value Y
- Parent Response Contains text value N
Defining Display Requirements from a KRMS Rule
In some cases the display requirement for a Questionnaire Question is based on data outside of the Questionnaire, such as the Sponsor or Proposal Type. For these use cases, the Questionnaire system is setup to link the Question Display Requirement directly to a KRMS rule. First, you will need to build your rule in the Agenda document per the instructions in the Cross Module Functionality - KRMS Basic Rule Setup article. Use the Questionnaire Agenda type, and do not list any additional action at the end of your Rule setup form. Once you have the rule in the system you can link it in your Questionnaire document. To find your rule click the ![]() icon next to the Add Rule row of the Requirements to Display panel of the question you want to link the display requirement to. This will bring up a Rule search. You can search by the Name or Description you entered for your rule in the Agenda document. After your search, click the return selected link next to the appropriate KRMS rule and the rule ID will populate your Questionnaire document. Complete this step for each Question in your Questionnaire with a KRMS driven display requirement.
icon next to the Add Rule row of the Requirements to Display panel of the question you want to link the display requirement to. This will bring up a Rule search. You can search by the Name or Description you entered for your rule in the Agenda document. After your search, click the return selected link next to the appropriate KRMS rule and the rule ID will populate your Questionnaire document. Complete this step for each Question in your Questionnaire with a KRMS driven display requirement.
Note: Make sure that the display requirements for any Questions are fulfilled in the PD document before the Questions page. Setting up a Budget or Supplemental Information requirement for Question display can cause problems since users will generally finish their Questions page before the Budget or Supplemental Information pages.
Adding Module Usage
Once you have all of your questions setup correctly in the Content section and have all of their Display Requirements entered you must add a Module Usage entry to the Questionnaire so it populates the correct section in Kuali Research. Scroll down to the Usage panel and complete the following fields.
- Module: Select the Module you want your Questionnaire to display in. In most cases, this will be Development Proposal.
- Module Sub Item Code: Leave this field blank unless you are entering a Questionnaire for Person Certification.
- Rule ID: You can lookup and return a KRMS Rule ID here per the instructions above for Defining Display Requirements from a KRMS rule. This rule will function as a display requirement for the entire questionnaire, instead of for a specific question.
- Mandatory: Check this if the user has to complete this questionnaire in order to submit their document for review. Leave it unchecked if these questions should display, but completing this Questionnaire is optional.
- Label: Enter the name you want to appear at the top of the Questionnaire in the Module you linked at the beginning of this section.

Press the add button.
When you have completed all the Questionnaire setup, and entered an appropriate usage click the submit button at the bottom of the screen. This Questionnaire will not populate documents that have not yet been routed for approval in the Kuali Research system.
Comments
0 comments
Article is closed for comments.