
Overview
The Workflow engine for Kuali Research is called PeopleFlow. It allows you to setup dynamic workflows which leverage your school's Unit Hierarchy to drive routing behavior. PeopleFlow integrates with the Kuali Business Rules Management system so you can also build routing rules based on the business data contained in your research documents. PeopleFlow works with the Proposal Development, Institutional Proposal, Award, and Subaward documents. The example below will walk through a very basic business process analysis and workflow specification, and the various steps necessary to setup a workflow in the system. This exercise details how to set up a relatively simple, but complete routing in a real world situation, but the individual steps for creating a simple PeopleFlow and using it to drive a workflow node are included.
Designing a Route Log
The first step to setting up a route log with PeopleFlow is to create a specification for your workflow outside the system. The PeopleFlow system automatically pull the workflow rules for the Lead Unit, and all the Units the Lead Unit reports up to in the Route Log. The order of the workflow stops is managed manually in the PeopleFlow document though. This is important because sometimes the order of workflow stops an institution needs does not match the order of Unit inheritance in their Unit Hierarchy, but it does necessitate careful planning. In Proposal Development the Route Log will also include all PeopleFlow stops for additional Proposal Units, such as Co Investigator Home Units, and the Units they report up to in the Unit Hierarchy. The example below shows how to go about planning a workflow structure in Kuali Research.
Example Workflow:
Stop 1 - OSP Initial Budget Review: This stop doesn't represent full central office approval, but rather an initial budget review so the financials are in order when the Unit Approvers review the proposal. This allows the PI to continue to revise their science during the remainder of the routing, but assured all Unit Approvers will see finalized budget details when they approve. This group is distinct from the final OSP Approval step.
Stop 2 - Investigators: This step represents approval and certification of all Investigators on a proposal.
Stop 3 - Unit Head Approvals: These stops include the primary approver for each unit, and delegates, if any are assigned by that approver.
Stop 4 - Final OSP Approval: This is a smaller group than the OSP Initial Budget Review and includes the individuals who will perform the actual submission to sponsor when appropriate.
In this setup the OSP Office wants to review the budget and identify any changes before the proposal routes to the Investigator to minimize notification and churn when proposals have to be returned for revision as part of the budget review process.
Some approvers are also PIs. When this is the case they do not want to have to approve multiple times on their documents.
Modifying the PD Standard Workflow
The first step to implementing the workflow described above is to make changes to the out of the box Proposal Development Workflow. The out of the box workflow only routes to the Lead Unit. For the business needs listed above the Chair and Dean approval levels will be taken out of the Standard Workflow, and moved to a series of individual unit PeopleFlows.
To complete this process first go to All Links and search for People Flow and select:

Next enter *Standard* in the Name search field and click the Search button. Click the Edit button next to the return named Proposal Development Standard Workflow. Then complete the following steps to modify the PD Standard Workflow PeopleFlow.
- Enter a value in the Description field that aligns with your institution's Description naming standards
- Delete stops 300 and 400
- Submit the PeopleFlow document to routing.
The remaining stops in the PD Standard Workflow document will fulfill the business needs listed in Stop 1 and 2 of the Example Workflow Specification above. These nodes will fire for all PD documents. In this scenario everyone in the OSP office who needs to receive initial review routing documents will need to be added to the OSP Approver role. Since we are using PeopleFlow for our routing the Responsibilities in the OSP Approver role should be deleted when users are added to this role to avoid duplicate routing.
Next we will create a PeopleFlow and KRMS Agenda document for every Unit that needs to take part in PD routing. Since many institutions replicate their Unit Hierarchy from a system of record, Hierarchies often include units that do not perform research. The following two phases only need to be repeated for Units that will actively submit, or need to actively provide approvals on PD documents.
Defining Peopleflow Stops
The first step of setting up Unit Chair and Dean routing for the business scenario above is to create a PeopleFlow document for each unit. It is easier to complete this step for all units before moving onto the Agenda stage.
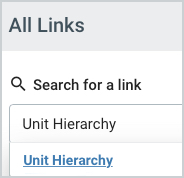
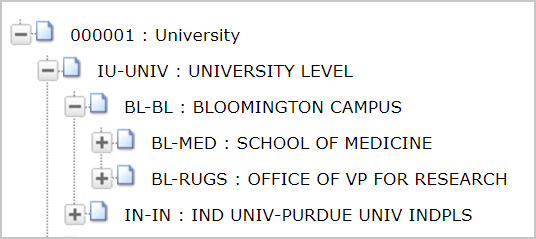
First go to the Unit Hierarchy to figure out how far down the hierarchy each unit is. This is required to make sure the workflow stops populate your route log in the correct order. List all the unit numbers you need to include in the workflow in a spreadsheet, then open your Unit Hierarchy by searching for Unit Hierarchy in All Links and selecting:
Next find each unit in Unit Hierarchy and note how many levels down the hierarchy it is. Treat 00001 as being 0 levels down the hierarchy and go from there. In your spreadsheet list a Stop ID next to each unit you will be creating a PeopleFlow document for based on the following logic.
Stop ID = 900 - (Number of levels down the Hierarchy*100).
So in the example below the Units listed would have the following numbers. Once you have all your stop IDs documented it will make going through Peopleflow setup much easier. The reason these stops are 100 ids apart from each other is that it makes it easier to add additional stops in between the unit head approval if that is needed after a institution's initial rollout.
|
 |
Create Unit Peopleflows
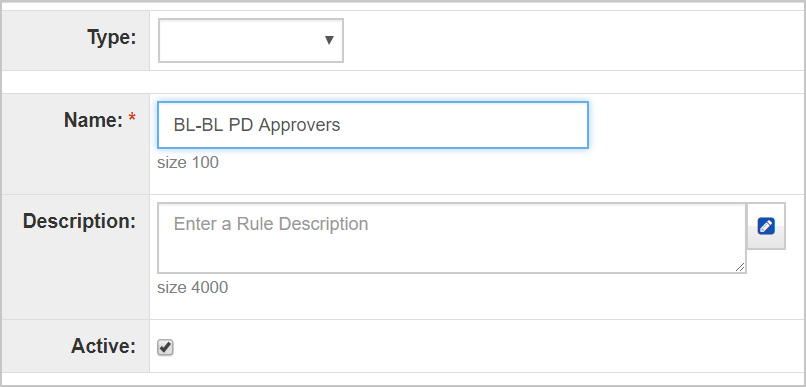
First Click on the PeopleFlow link in the Central Admin menu per the screenshot above, then click on the Create New button in the upper right hand corner of the screen. This will open a new PeopleFlow document, complete the following fields as appropriate.
- Description: Enter a description per your institution's naming standards.
- Namespace Code: KC-WKFLW or KC-PD will both work for this scenario.
- Name: Follow a consistent naming convention that includes your unit name to simplify the process of finding the PeopleFlows in the future. Example [Unit Number] PD Approvers
- Type: KC-WKFLW - Unit Specific Development Proposal Peopleflow.
- Unit Number: The Unit associated with this PeopleFlow. It should be the same unit listed in the Name.
- Active: Checked
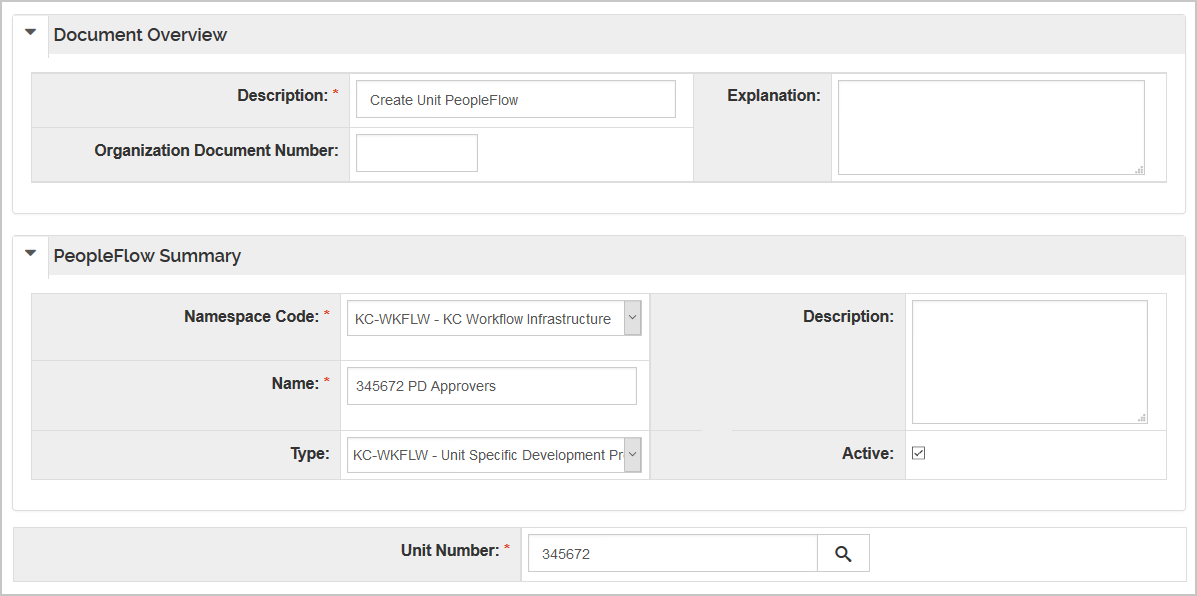
Using the Unit Specific Development Proposal Peopleflow will allow the use of Derived Roles associated with units in this PeopleFlow, and the individuals for the unit listed will always be pulled instead of the individual for the Lead Unit on the Proposal document firing this PeopleFlow. This is required to include participating Proposal Units in the routing other than the Lead Unit.
Next we will add the Stop ID for this Unit. Complete the following fields in the PeopleFlow Members panel and press the Add Button.
- Stop: Enter the Stop ID associated with the Unit you are setting up from the spreadsheet you put together earlier.
- Member Type: Role
- Member: Do a lookup for Role Type KC96. This will return the Proposal Department Unit Heads role. Press the select button next to this lookup return.
- All or First Action: First. All is required if you are creating a stop with a multi member group or role and you need every person in the workflow stop to approve before the document moves to the next stage in the routing.
- Force Action: Uncheck
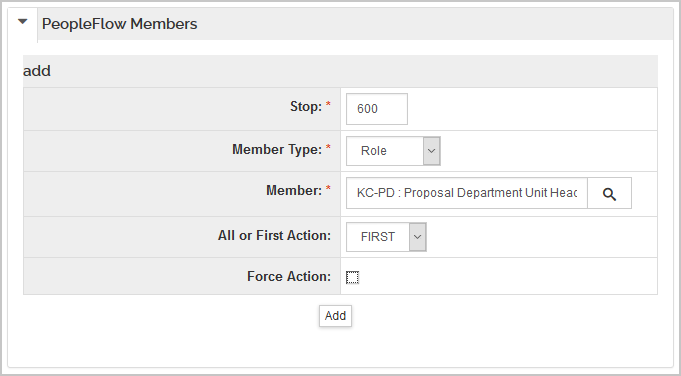
In the scenario above if we leave Force Action checked then each workflow stop will need to be approved separately. Since unit approvers are sometimes Investigators, and don't want to have to approve multiple times on their proposals we will not force these actions, and in this scenario Investigators will be given the option to not receive future action requests when they approve as an Investigator on one of their proposals.
The next step requires setting up a Unit Head Delegate in the Unit Administrator table, and creating a Derived Role linked to that Unit Administrator Type. The instructions for completing this process are in the article Setting Up Roles for Unit Administrator Types.
Navigate to the Stop you just added to your Peopleflow document and complete the following fields in the Member Delegates section. Then press the add button.
- Member Type: Role
- Member: Lookup the Delegates Derived role you setup in advance.
- Delegation Type Code: Secondary. If you set this to Secondary then the primary approver and all delegates will receive notifications when a document routes to this stop for approval. If you set this as Primary then only the delegates will receive notification when an item routes to this stop for approval. Some institutions will maintain this on a unit by unit basis to accommodate chair and dean preference, but for initial setup it is safer to have notifications go to all individuals at a Peopleflow stop.
- All or First Action: First. All is required if you are creating a stop with a multi member group or role and you need every person in the workflow stop to approve before the document moves to the next stage in the routing.
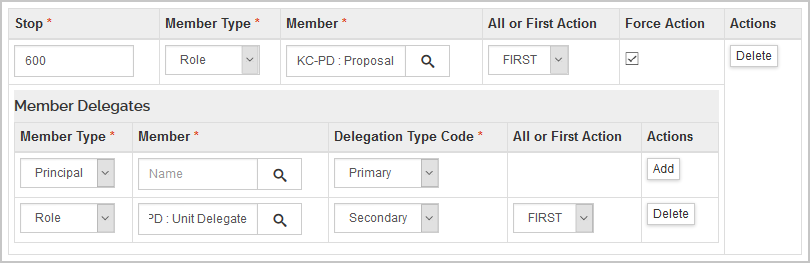
Once you have added the delegates to your PeopleFlow press the submit button.
Create Unit Routing KRMS Agenda Documents
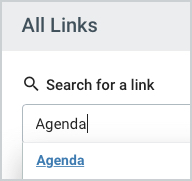
First go to All Links and search for Agenda and select:
This will open the Agenda search. You can either search for an existing Agenda that you want to add additional rules to, or you can click on the Create New button in the upper right hand corner of the screen to create a new Agenda document.
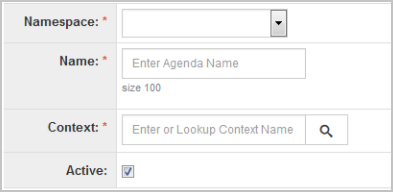
Once you have initiated your new Agenda document you will need to complete the following fields. This lists Proposal Development as that is the module we are using for this example, but this can be done with IP, Award, or Subaward as well and you would adjust your Namespace and Context accordingly.
- Namespace: Proposal Development
- Name: List the same name you used for your Peopleflow document.
- Context: KC Proposal Development Context. You must execute a search for this context and return it in order for it to register properly in the Agenda document.
- Active: If you uncheck this field then none of the rules in this Agenda will function. This can be useful for retiring rules as business processes change, or if you accidentally create a rule that creates a problem you can deactivate it immediately and then begin to debug your logic.
Once you have entered your Context the following fields will appear
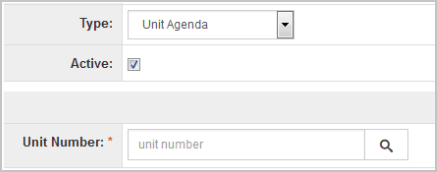
Type: Unit Agenda
After entering the Agenda Type the following field will appear
Unit Number: List the unit you are setting up your workflow rule for. This should be the same unit listed in the above Peopleflow.
Next click the Add Rule button on the Rules toolbar

This will take you into the new rule editor. First complete the following fields.
- Type: Leave this field blank for a general workflow rule that will fire on all proposals that include the unit. If you want the workflow rule to only fire when specific business logic is met follow the instructions in the KRMS Basic Rule Setup.
- Name: List the same name you used for your Peopleflow document.
- Description: This can be left blank, but you can put explanatory text here if desired.
- Active: Checked
Linking your PeopleFlow and KRMS Agenda
Next scroll to the bottom of your KRMS rule and select the Route to PeopleFlow Type in the Action tab. Complete the following fields.
- PeopleFlow ID: Lookup the Peopleflow you made earlier in this activity that is paired with this Agenda and click the select button next to it.
- PeopleFlow Name: This will populate automatically when you search for and return you PeopleFlow.
- Name: The same name you used for your PeopleFlow, Agenda, and Rule name.
- Description:This can be left blank, but you can put explanatory text here if desired.
Press the Add Rule button, then when the main Agenda screen reloads press the Submit button.
Complete the Create Unit PeopleFlows and Create Unit Routing KRMS Agenda Documents for all units that need to be included in your routing.
Comments
0 comments
Article is closed for comments.